In this part I show you how to add custom menus to your block entities and create a screen to render the menu in the game. This part is based on everything shown in the Basic Container Blocks tutorial. I will cover the differences between a menu and a screen and show you how to add functionality to your blocks.
Additional Resources
The Tutorial Mod used here can be found on GitHub (state after this tutorial).
A video version can be found below.
Contents
- Menus vs Screens
- The Menu Class
- Registering Menu Types
- Block Entity Functionality
- The Screen Class
- Linking Screens and Menus
- Minecraft
- Video
Menus vs Screens
The first thing you need to understand is the difference between menus and screens:
A menu represents a logical representation of what you see on screen when interacting with a block for example. It links performed actions like taking an item with the underlying data storage, e.g. a BlockEntity. A menu does not store any data itself, it just makes the backend data accessible to the client.
A screen on the other hand is the GUI visible for the client. If linked to a menu, it renders the data accessible through the menu and propagates changes made through the menu back to the data holder. A screen can also appear without an attached menu, in this case however it can only change client side parameters.
Menus act as the bridge between the server-side only data of for example BlockEntities and the client-side only rendering layer of a screen. Whilst a screen therefore only exists on the client side, its linked menu exists for both the client and the server. This is the relation of those objects in a simplified way:

The Menu Class
The first thing we need is a class for our menu. This class should extend from AbstractContainerMenu, since we use a container block as our basis. Inside our menu class we first want to create two constructors: One for the client-side version of the menu and one for the server-side version. The main purpose of the constructor is to specify the slot positions of our menu and to store the linked Container and ContainerData objects. With the variables and the two constructors our class should look something like this:
public class GUIBlockMenu extends AbstractContainerMenu {

    public final Container container;
    public final ContainerData data;

    // Client Side Constructor
    public GUIBlockMenu(int containerID, Inventory playerInventory) {
        this(containerID, playerInventory, new SimpleContainer(2), new SimpleContainerData(1));
    }

    // Server Side Constructor
    public GUIBlockMenu(int containerID, Inventory playerInventory, Container container, ContainerData containerData) {
        super(TutorialModMenuTypes.GUI_BLOCK.get(), containerID);
        checkContainerSize(container, 2);
        checkContainerDataCount(containerData, 1);

        this.container = container;
        this.data = containerData;

        // Player inventory
        for (int i = 0; i < 3; ++i) {
            for (int j = 0; j < 9; ++j) {
                this.addSlot(new Slot(playerInventory, j + i * 9 + 9, 8 + j * 18, 84 + i * 18));
            }
        }
        // Player Hotbar
        for (int i = 0; i < 9; ++i) {
            this.addSlot(new Slot(playerInventory, i, 8 + i * 18, 142));
        }

        // Own slots
        this.addSlot(new Slot(container, 0, 62, 35));
        this.addSlot(new Slot(container, 1, 98, 35));

        // Data slots
        this.addDataSlots(containerData);
    }
}
Constructors
The client-side constructor takes a containerID and the playerInventory as parameters and passes them to the server-side constructor, together with a new instance of SimpleContainer (with the slot count of our container block as parameter) and a new instance of SimpleContainerData (only required if you want to sync something other than item stacks, again, the parameter here is the number of different values you need to sync).
The server-side constructor additionally has a container parameter for our underlying container (here our BlockEntity) and if required a containerData parameter for our synced data. We first call the superconstructor with our MenuType (see below) and our containerID. Next we check the passed container and containerData fields for the correct size to prevent errors and store them in our variables for access later. Finally we add the slots to our menu, starting with the player inventory. For each slot in the inventory we call addSlot once. The first parameter of the Slot contructor is the linked Inventory/Container. Next we need to pass the slotID (for our player inventory 0-8 represent the hotbar and 9-35 the actual inventory), and the x and y positions of the slot relative to the texture. Each slot is 18×18 pixels by default. We repeat this process for the player hotbar.
Next we need to also add the slots of our own container and its GUI, here we use the container object of the constructor parameter and just number the slots in ascending order. Finally we need to add our containerData using the addDataSlots() method.
Methods
Our menu class also needs to implement two methods: quickMoveStack() to handle shift-clicking and stillValid() to see if the menu should stay open or close, for example when the player moves away.
The latter one of those is very easy, since we just need to call the corresponding method of our container:
@Override
public boolean stillValid(Player player) {
    return container.stillValid(player);
}
The quickMoveStack() method on the other hand is a bit more complicated:
@Override
public ItemStack quickMoveStack(Player player, int index) {
    ItemStack newStack = ItemStack.EMPTY;
    Slot slot = this.slots.get(index);
    if(slot.hasItem()) {
        ItemStack originalStack = slot.getItem();
        newStack = originalStack.copy();

         if (index < 36) {
            if (!moveItemStackTo(originalStack, 36, 36 + 2, false)) {
                return ItemStack.EMPTY;
            }
        } else if (index < 36 + 2) {
            if (!moveItemStackTo(originalStack, 0, 36, false)) {
                return ItemStack.EMPTY;
            }
        } else {
            TutorialMod.LOGGER.error("Invalid slot index: {}", index);
            return ItemStack.EMPTY;
        }

         if (originalStack.isEmpty()) {
            slot.set(ItemStack.EMPTY);
        } else {
            slot.setChanged();
        }

        slot.onTake(player, originalStack);
    }
    return newStack;
}
We first define a new empty ItemStack, this represents the items that should move inventories. We also get the slot that has been clicked by the given slot index. If the slot has an item in it, we need to do further checks, otherwise we can just return the empty stack, since there are no items to be moved.
If however the slot contains an item, we get it and copy it over to our newStack as well. Next we differentiate the slot index: If it’s one of the first 36 slots, i.e. the player inventory, we try to move the stack using the moveItemStackTo() method to slots in the range from 36 (inclusive) to 38 (exclusive). If the move fails, we return an empty stack. In a similar way we handle the other way around if the slot number is between 36 (inclusive) and 38 (exclusive). Here we try to move the stack to the player inventory, so slots 0 through 35. If we have a higher slot index, something went wrong and we return an empty ItemStack.
Finally we need to check if the moved stack is now empty and set the slot to be empty if this is the case, otherwise we indicate that the slot has been changed. The last thing we class is the onTake() method of the slot to indicate that the given items have been taken from it.
Registering Menu Types
Next we need to register our menu as a MenuType to the game. Similar to everything else we do this using a DeferredRegister and RegistrySupplier. The complete registration looks like this:
public class TutorialModMenuTypes {

    private static final DeferredRegister<MenuType<?>> MENU_TYPES =
                DeferredRegister.create(TutorialMod.MOD_ID, Registries.MENU);

    public static RegistrySupplier<MenuType<GUIBlockMenu>> GUI_BLOCK;

    public static void initMenuTypes(){
        GUI_BLOCK = registerMenuType("gui_block", () -> new MenuType<>(GUIBlockMenu::new, FeatureFlagSet.of()));

        MENU_TYPES.register();
    }

    public static <T extends MenuType<?>> RegistrySupplier<T> registerMenuType(String name, Supplier<T> menuType){
        return MENU_TYPES.register(ResourceLocation.fromNamespaceAndPath(TutorialMod.MOD_ID, name), menuType);
    }
}
Block Entity Functionality
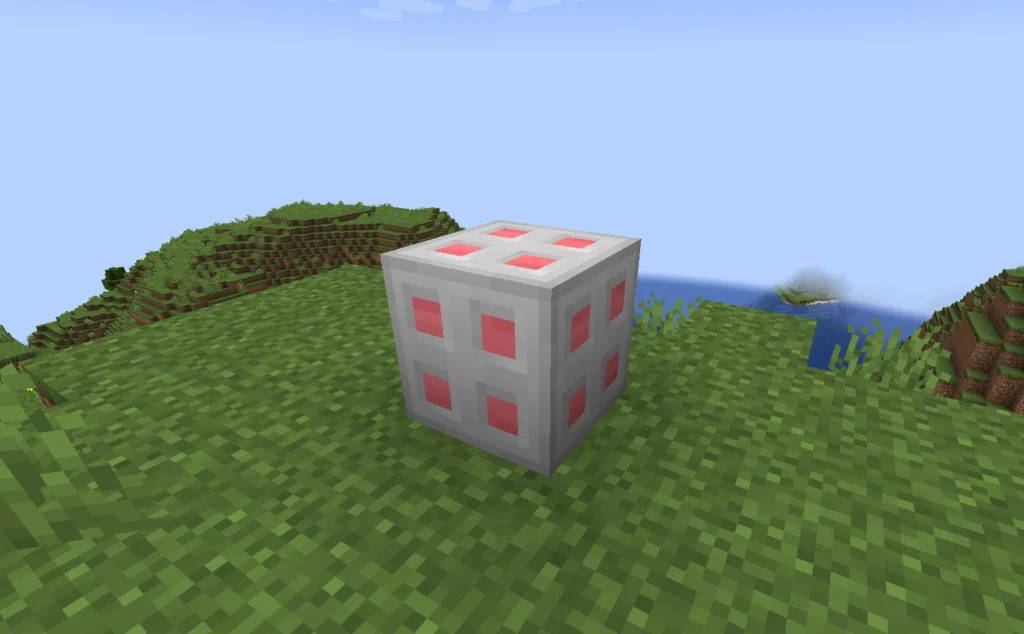
Before we continue with the screen for our menu, I want to go over the functionality of our GUI Block. The block should be capable of emptying water buckets to an internal storage and then refill them again. To show you how this interacts with the menu, I will explain this functionality quickly. You can find the full class on GitHub.
The first thing we need is a variable to store the number of buckets inside of our block and a ContainerData object so that we can access this data through the menu and screen. ContainerData is only able to sync shorts, even though they are represented as integers in the code. This is due to the underlying protocol only allowing 16bits per index. We can create the container data object like this:
private int storedBuckets = 0;
private ContainerData data;

...

this.data = new ContainerData() {
    @Override
    public int get(int index) {
        if(index == 0) return storedBuckets;
        return -1;
    }

    @Override
    public void set(int index, int value) {
        if(index == 0) storedBuckets = value;
    }

    @Override
    public int getCount() {
        return 1;
    }
};
The getCount() method should return the number of used indices (and match the number specified in the menu classes constructor). The get and set methods should then modify and read the data from your BlockEntity class as needed. The createMenu() method of our BlockEntity then needs to return the server side menu representation like this:
@Override
protected AbstractContainerMenu createMenu(int containerId, Inventory inventory) {
    return new GUIBlockMenu(containerId, inventory, this, this.data);
}
Finally for the actual functionality of storing buckets of water, we implement it inside of our BlockEntityTicker (see Block Entity Basics):
@Override
public void tick(Level level, BlockPos blockPos, BlockState blockState, T blockEntity) {
    if (blockEntity instanceof GUIBlockEntity guiBlockEntity) {
        ItemStack firstSlot = guiBlockEntity.getItem(0);
        if(firstSlot.is(Items.WATER_BUCKET)) {
            if(guiBlockEntity.storedBuckets < 64) {
                guiBlockEntity.storedBuckets++;
                guiBlockEntity.setItem(0, new ItemStack(Items.BUCKET));
            }
        }
        ItemStack secondSlot = guiBlockEntity.getItem(1);
        if(secondSlot.is(Items.BUCKET)) {
            if(guiBlockEntity.storedBuckets > 0) {
                guiBlockEntity.storedBuckets--;
                guiBlockEntity.setItem(1, new ItemStack(Items.WATER_BUCKET));
            }
        }
    }
}
We check the first slot for a water bucket, and if we have stored less than 64 buckets, we add another stored bucket of water and replace the item with an empty bucket. Furthermore we check the second slot for an empty bucket and if we have stored at least one bucket, we remove one stored bucket and replace the empty bucket with a water bucket.
The Screen Class
Next we can create a class for our screen. This class is handling all the rendering related things of our menu and thus needs to extend AbstractContainerScreen<GUIBlockMenu> (replace the type parameter with your menu class). We also need to create a constructor matching and calling the superconstructor here:
public class GUIBlockScreen extends AbstractContainerScreen<GUIBlockMenu> {

    public GUIBlockScreen(GUIBlockMenu menu, Inventory playerInventory, Component title) {
        super(menu, playerInventory, title);
    }

}
Background Rendering
We are required to implement the renderBg() method. This method is used to render the background of the screen, i.e. the GUI texture. For our block we use the following base texture:
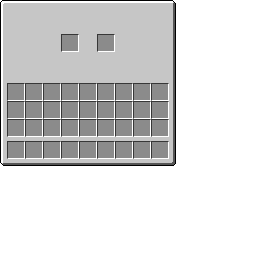
The red border around the image shows you the actual file border. As you can see the png-File is larger than the visible part of the GUI itself. This will become relevant in the renderBg() method:
private static final ResourceLocation BACKGROUND =
        ResourceLocation.fromNamespaceAndPath(TutorialMod.MOD_ID, "textures/gui/gui_block/gui_block.png");

@Override
protected void renderBg(GuiGraphics guiGraphics, float partialTick, int mouseX, int mouseY) {
    RenderSystem.setShaderColor(1.0F, 1.0F, 1.0F, 1.0F);
    RenderSystem.setShaderTexture(0, BACKGROUND);

    int x = (width - imageWidth) / 2;
    int y = (height - imageHeight) / 2;
    guiGraphics.blit(RenderType::guiTextured, BACKGROUND, x, y, 0, 0, imageWidth, imageHeight, 256, 256);
}
We first specify the ResourceLocation of out background texture. Inside of the renderBg() method itself, we first set the shader color so that it doesn’t modify any of our colors. We also set the shader texture with index 0 to our background image. Next we determine the x and y position of the rendered image.
The width and height variables correspond to the visible screen area, the imageWidth and imageHeight variables to the visible portion of our texture. For GUIs matching the size of a regular chest GUI you don’t need to modify or set the image dimensions. If however your visible area is smaller or large, you need to set those values in your screen class constructor.
Finally we can draw the background texture to the screen using the guiGraphics.blit() method. The first parameter specifies what should be rendered, next we specify the texture, the render position on screen, an offset, the visible image dimensions and the texture file dimensions.
NOTE FOR 1.21.1 AND EARLIER:
In earlier versions this works slightly different. First of all you need an additional line at the top of the method to specify the shader. This has been replaced by the RenderType in current versions. The line looks like this:
RenderSystem.setShader(GameRenderer::getPositionTexShader);Furthermore the guiGraphics.blit() method does not need a RenderType specification and the texture dimensions are optional if the image has 256 by 256 pixels. The modified line looks like this:
guiGraphics.blit(BACKGROUND, x, y, 0, 0, imageWidth, imageHeight);Tooltip and Text Rendering
With that the menu would work and render the texture, but there would be no tooltips for items inside of it. Furthermore we also want to display the amount of stored water inside of the GUI. For this we want to override the render() method of our screen with the following content:
@Override
public void render(GuiGraphics guiGraphics, int mouseX, int mouseY, float partialTick) {
    super.render(guiGraphics, mouseX, mouseY, partialTick);
    renderTooltip(guiGraphics, mouseX, mouseY);

    int y = ((height - imageHeight) / 2) + 24;
    guiGraphics.drawCenteredString(font, "Stored Water: " + this.menu.data.get(0), width / 2, y, 0x000000);
}
First we call the super method since it manages most of the rendering related things for us. Next we call the renderTooltips() method to draw the tooltips for items when hovering over them. To add a text to our GUI we can use any of guiGraphics.draw…String() methods. Here I chose the drawCenteredString() method, since it centers the string from the specified position.
All such draw methods require a font as the first parameter. Here we just use the default font of the Screen class. Next we need to specify the text to draw. This can be either a plain string, a FormattedText object or a Component. For the sake of simplicity I use a plain String here. The final three parameters are then the x and y coordinates relative to the entire screen and the color the text should be draw in.
To now get the number of stored water buckets we can access the menu linked to the screen and from there the ContainerData object. Now we can use the get() method to obtain our value. If you have a screen where you could also set a value, you would just call the set() method on the ContainerData, which would then execute as specified in the BlockEntity class.
Linking Screens and Menus
The last piece of the puzzle is the linking of screens and menus. We need to do this so that the game knows what screen to use when the menu is opened. For this you need to add the following after you initialized your Menu Types:
ClientLifecycleEvent.CLIENT_STARTED.register(client -> {
    MenuRegistry.registerScreenFactory(TutorialModMenuTypes.GUI_BLOCK.get(), GUIBlockScreen::new);
});
The ClientLifecycleEvent block makes sure that this linking is only done on the client side, since the server doesn’t have a render instance and would therefore crash. To link menu and screen together we use the MenuRegistry provided by Architectury and call its registerScreenFactory() method. This method takes our Menu Type and the constructor of our Screen class as parameters.
NEOFORGE ISSUES:
Whilst this is the intended way to do this and should work, I experienced some issues with NeoForge not correctly linking the two together. If this is the case for you as well, you can add the following to your NeoForge mod class to fix this:
@EventBusSubscriber(modid = TutorialMod.MOD_ID, bus = EventBusSubscriber.Bus.MOD, value = Dist.CLIENT)
public static class ClientModEvents {
    @SubscribeEvent
    public static void registerScreens(RegisterMenuScreensEvent event) {
        event.register(TutorialModMenuTypes.GUI_BLOCK.get(), GUIBlockScreen::new);
    }
}
Minecraft
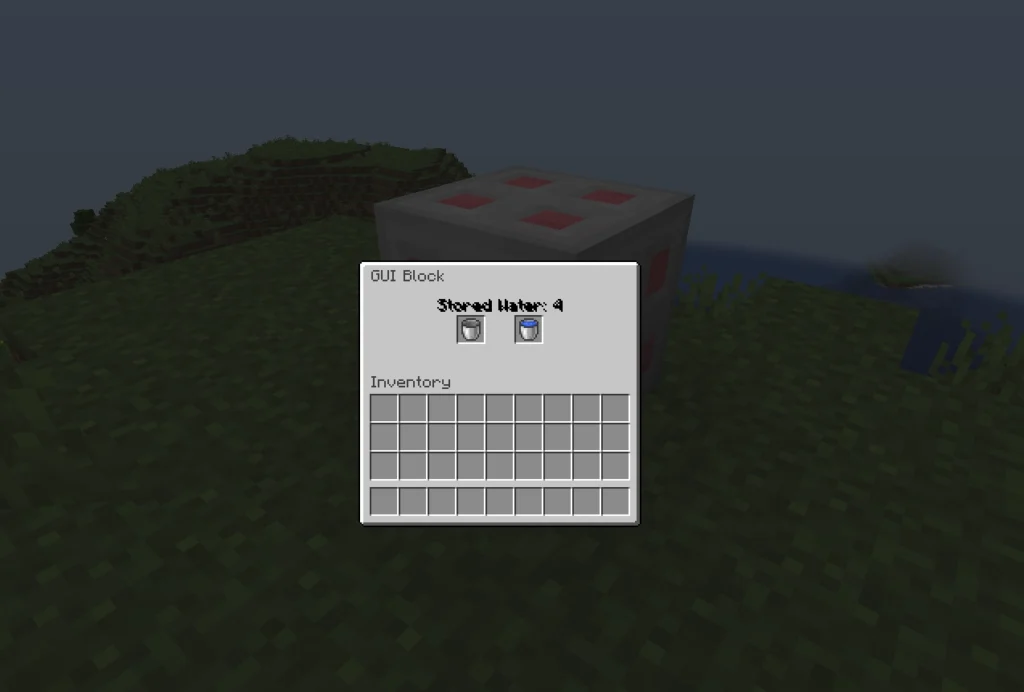
With that we can place down our block in Minecraft and see our GUI and Menu in action:
Video
Please accept YouTube cookies to play this video. By accepting you will be accessing content from YouTube, a service provided by an external third party.
If you accept this notice, your choice will be saved and the page will refresh.
Related Content
Check out the entire series here.