In this part I show you how to expand your basic block entity from the last part into a container block. Container blocks are all blocks in the game that can store items, like chests or barrels. We will add the item storage related methods to our block entity and make the game open a matching GUI when our block is right-clicked.
Additional Resources
The Tutorial Mod used here can be found on GitHub (state after this tutorial).
A video version can be found below.
Contents
Modifying the BlockEntity
First we need to expand the block entity class we created in the last part. So far we used the regular BlockEntity class as our superclass; for container blocks however we need to use BaseContainerBlockEntity as superclass, since it provides us with some of the desired functionality already. We need to add a few fields and implement a couple of methds, which I will explain after we take a look at the resulting code:
public class RubyCrateEntity extends BaseContainerBlockEntity {

    public static final int INVENTORY_SIZE = 27;
    private NonNullList<ItemStack> items;

    public RubyCrateEntity(BlockPos pos, BlockState state) {
        super(TutorialModBlockEntityTypes.RUBY_CRATE.get(), pos, state);

        this.items = NonNullList.withSize(INVENTORY_SIZE, ItemStack.EMPTY);
    }

    @Override
    protected Component getDefaultName() {
        return Component.translatable("container.tutorial_mod.ruby_crate");
    }

    @Override
    protected NonNullList<ItemStack> getItems() {
        return this.items;
    }

    @Override
    protected void setItems(NonNullList<ItemStack> items) {
        this.items = items;
    }

    @Override
    public int getContainerSize() {
        return INVENTORY_SIZE;
    }

    @Override
    protected AbstractContainerMenu createMenu(int containerId, Inventory playerInventory) {
        return ChestMenu.threeRows(containerId, playerInventory, this);
    }
}
First we need to define the size of the inventory of our block. Here I chose 27, similar to most regular vanilla storage blocks. Additionally we need to define a variable that can later hold the contents of our inventory. We need to use a NonNullList<> here, since we never want to use null itemstacks, since that would break the game. Next in our constructor we initialize this list using our size with ItemStack.EMPTY items. This makes all of our slots empty by default for our crate. Furthermore we now need to implement some methods, starting with the getDefaultName() one. Here we need to return a Component that is displayed at the top of the menu when the player opens it. In the example I use a translatable one, if you do this as well, don’t forget to specify the key in your language file.
The next two methods are required so that the game can interact with the stored items. We implement the getItems() method to return our items list. In a similar way we implement the setItems() method to set our items list. Furthermore we need to implement the getContainerSize() method to return the number of slots we have, as defined above. Finally we need a way to open a menu for our block entity. We do this through the createMenu() method. In the example we use the vanilla provided ChestMenu.threeRows() method, that opens a regular chest GUI.
Opening the Container GUI
We now have a block entity that can store items, but we have no way of seeing this as of now. For this we need to implement that the game shows us the GUI when we right-click the block. The problem here is that the game does not provide us with a good way to detect right-clicks. But Architectury comes to the rescue here and allows us to register an InteractionEvent for this purpose.
Right Click Events
For this we need to implement the RightClickBlock interaction event in our block class. With this we can implement the click() method that is then called every time any block is right-clicked. We also need to make sure that we register our event to Architecturys event system:
public class RubyCrateBlock extends BaseEntityBlock implements InteractionEvent.RightClickBlock {
    ...
    protected RubyCrateBlock(Properties properties) {
        ...
        InteractionEvent.RIGHT_CLICK_BLOCK.register(this);
        ...
    }
    ...

    @Override
    public InteractionResult click(Player player, InteractionHand interactionHand, BlockPos blockPos, Direction direction) {
        ...
        return InteractionResult.SUCCESS;
    }
    ...
}
Inside of the click() method we can then perform any checks and actions desired (see below). At the end of this method we need to return an InteractionResult to tell the game the result of the interaction. The most relevant values here are:
- SUCCESS: The action was successful and the game should stop checking for further things that can happen.
- FAIL: The action was not successful, but the game should still stop checking for further actions (e.g. invalid Minecart placement).
- PASS: There was no action performed, thus the game should continue to check for other actions. This is the default action for all blocks that don’t do anything special, like stone.
Showing the Menu
As said before, the click() method will be called every time a block is right-clicked. For this reason we first need to check whether the clicked block is actually a Ruby Crate. We do this by checking if there is a matching block entity at the clicked BlockPos. If this is not the case, we return PASS as a result and don’t open the menu. We return PASS as well, when the player is pressing the shift key. We allow sneaking players to place blocks on the side of our block instead of opening its menu this way. If however we have a correct block entity and are not sneaking, we open the menu for our block entity. In this case we tell the game that the interaction was a SUCCESS so that no block is placed.
@Override
public InteractionResult click(Player player, InteractionHand interactionHand, BlockPos blockPos, Direction direction) {
    if(player.level().getBlockEntity(blockPos) == null
                || !(player.level().getBlockEntity(blockPos) instanceof RubyCrateEntity blockEntity)){
        return InteractionResult.PASS;
    }
    if(player.isShiftKeyDown()){
        return InteractionResult.PASS;
    }

    player.openMenu(blockEntity);

    return InteractionResult.SUCCESS;
}
Dropping Items on break
The last thing we want to implement for our container before we test it in the game, is a correct break behaviour. Right now if we were to break the block, its contents would simply vanish. To instead drop them on the ground we can implement the onRemove() method in our block class. In this method we can then simply use the Minecraft provided Containers.dropContentsOnDestroy() method to drop everything on the ground:
@Override
protected void onRemove(BlockState state, Level level, BlockPos pos, BlockState newState, boolean movedByPiston) {
    Containers.dropContentsOnDestroy(state, newState, level, pos);
    super.onRemove(state, level, pos, newState, movedByPiston);
}
Minecraft
That concludes everything we need to implement, so let’s see how our container block looks and works in the game:
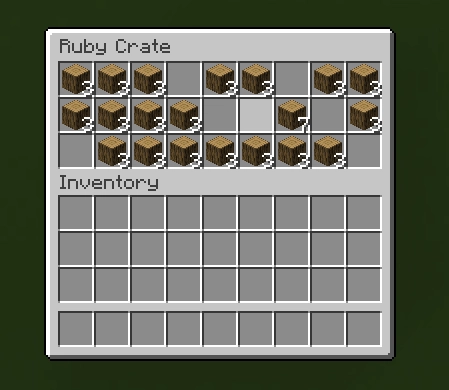
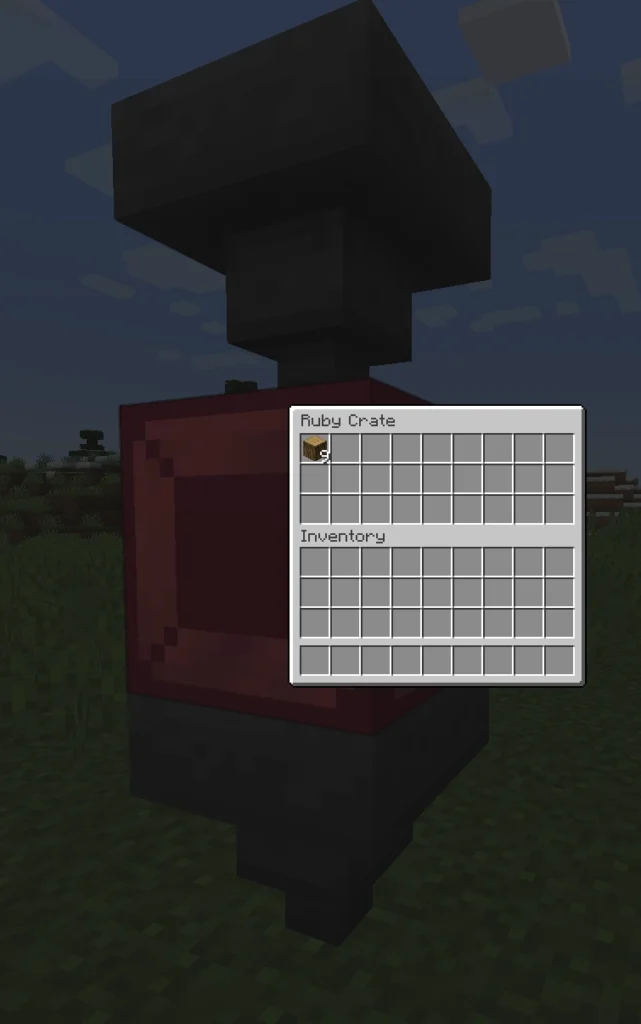
As you can see in the right picture, hoppers will work with our Ruby Crate, since we used the BaseContainerBlockEntity superclass which provides this functionality without any additional implementation requirements.
Video
Please accept YouTube cookies to play this video. By accepting you will be accessing content from YouTube, a service provided by an external third party.
If you accept this notice, your choice will be saved and the page will refresh.
Related Content
Check out the entire series here.
Pingback: Basic Furnace Block - Architectury Modding Tutorial - Larsen's Mods
Pingback: Menus and Screens - Architectury API Multiplatform Modding - Larsen's Mods