You already know how you can add Basic Items to the game from an earlier part, this time I show you how to add slightly more complex Items, namely Tools and Swords to the game. We will first need to create a tool material, after which we can add the actual tools.
Additional Resources
The Tutorial Mod used here can be found on GitHub (state after this tutorial).
A video version can be found below.
Contents
Tool Material and Item Tag
First we need to define the properties of the material of which our tools will be made, in our case the Ruby. We need to create an item tag for this to which we can later add our Ruby. With this we tell the game that the Ruby should be able to repair our tool items. We use the following to define an item tag:
public static final TagKey<Item> RUBY_TOOL_MATERIALS = TagKey.create(
        Registries.ITEM, ResourceLocation.fromNamespaceAndPath("tutorial_mod", "ruby_tool_materials")
);
We specify that our TagKey is of the type Item and thus should apply to the Item-Registry (Registries.ITEM). Furthermore we also specify the ResourceLocation where our tags json-File can be found, in which we later add items to the tag. Here we specify our ModID as the namespace and ruby_tool_materials as the file.
In the next step we need to define the ToolMaterial itself. We need to write the following code to do so:
public static final ToolMaterial RUBY = new ToolMaterial(
BlockTags.INCORRECT_FOR_DIAMOND_TOOL, //Blocks that won't drop when broken with this tool
1024, //Durability
7f, //Tool Speed
2.5f, //Base Attack Modifier
12, //Enchantability
TutorialModTags.RUBY_TOOL_MATERIALS //Repair Materials
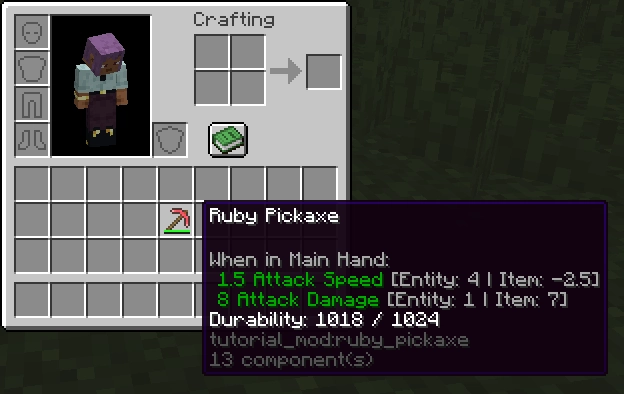
);With the first parameter we tell the game which blocks this tool should not be able to break successfully. We need to use the INCORRECT_FOR_ tags instead of the NEEDS_ tags, as the latter only contain the blocks at that specific level. The INCORRECT_FOR_ tags however are computed during runtime and contain also blocks that have a higher level. Our tool in this example has the same mining level as diamond tools. Next we specify the durability of tools created from this material, followed by the base tool speed. Furthermore we need to specify an attack modifier that applies to all tools of this material and the enchantability of the material. The higher this value is the better the possible enchantments get. Finally we specify the tag we created earlier to mark all items that can repair tools from this material in an anvil.
Tool Items
Now that we have our material, we can create our items. I will only show the process for a pickaxe, but it is similar for all the other tools and swords. Please see the GitHub Repository for a complete set. Similar to the basic items we first define a RegistrySupplier and then use our helper methods to create the item:
public static RegistrySupplier<Item> RUBY_PICKAXE;

public static void initItems() {
    ...
    RUBY_PICKAXE = registerItem("ruby_pickaxe",
        () -> new PickaxeItem(TutorialModToolMaterials.RUBY, 4.5f, -2.5f,
                  baseProperties("ruby_pickaxe").arch$tab(TutorialModTabs.TUTORIAL_TAB)
        )
    );
    ...
}
As you can see we create a new PickaxeItem here, for the other tools you just need to replace this with the correct class. For the sword you would for example create a new SwordItem here. As parameters of these item types you first put the ToolMaterial. Next you put an attack damage modifier and an attack speed modifier. Note that those only modify the tool when used against enemies; they are not relevant for breaking blocks. Finally you put the ItemProperties, similar to any other item.
Item Resources
The next step is to add the resource files for our item. These include language, texture, model and item definitions and are mostly similar to the basic items. The only difference lies in the resources/assets/tutorial_mod/models/item/ruby_pickaxe.json (or any other tool) file. We use minecraft:item/handheld as parent model instead of minecraft:item/generated. This makes the tool render as any other vanilla tool in game. Just to have everything in one place, here are all the necessary resources you need to add:
resources/assets/tutorial_mod/items/ruby_pickaxe.json:
{
  "model": {
    "type": "minecraft:model",
    "model": "tutorial_mod:item/ruby_pickaxe"
  }
}resources/assets/tutorial_mod/models/item/ruby_pickaxe.json:
{
  "parent": "minecraft:item/handheld",
  "textures": {
    "layer0": "tutorial_mod:item/ruby_pickaxe"
  }
}resources/assets/tutorial_mod/lang/en_us.json:
{
  ...

  "item.tutorial_mod.ruby_pickaxe": "Ruby Pickaxe",
  ...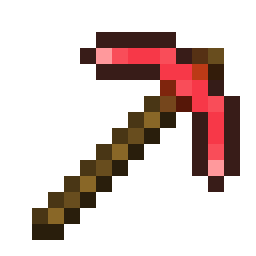
}resources/assets/tutorial_mod/textures/item/ruby_pickaxe.png:
Add Items to Tag
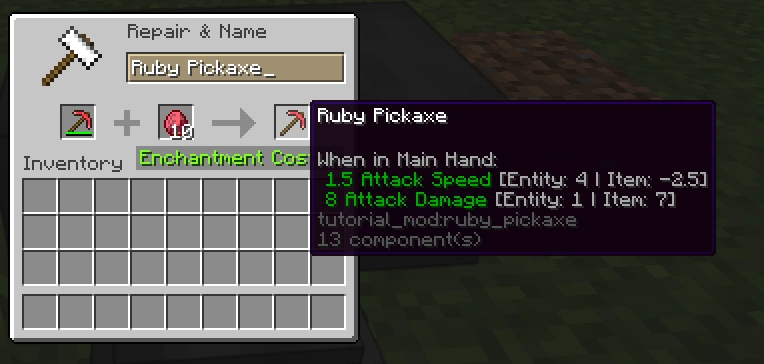
Finally we need to add our Ruby to the tag we created earlier, so that we can repair our tools with them. For this we create a tag definition file in our mods integrated datapack at resources/data/tutorial_mod/tags/item/ruby_tool_materials.json. The name of this file is the name we specified earlier when creating the tag. The contents of this file look like this:
{
  "replace": false,
  "values": ["tutorial_mod:ruby"]
}
Ingame
That is everything we need to do to add tools to the game, typically you would now also add crafting recipes for those tools. If you go into the game you can see our Pickaxe with the details we specified in our tool material. You can also see that we can repair a broken Ruby Pickaxe with our Ruby item:
With that you now know how to add tools and swords to Minecraft. In the next part we will add armor to the game.
Video
Please accept YouTube cookies to play this video. By accepting you will be accessing content from YouTube, a service provided by an external third party.
If you accept this notice, your choice will be saved and the page will refresh.
Related Content
Check out the entire series here.
Pingback: Armor - Architectury API Multiplatform Modding - Larsen's Mods