Now that you have some Blocks and Items in your mod, it is time to make them craftable. Every mod consists of two components: The custom resources, like Items and Blocks, and a vanilla-style datapack for recipes, tags, etc. Therefore we don’t need to write code for our recipes, but just json-Files for the integrated datapack. All of those should be placed under resources/data/<modID>/recipe.
Additional Resources
The Tutorial Mod used here can be found on GitHub (state after this tutorial).
A video version can be found below.
Contents
Shaped Recipes
First we will add a shaped recipe to craft our Ruby Block out of 9 Rubys. The json-File for this recipe looks like this:
{
  "type": "minecraft:crafting_shaped",
  "pattern": [
    "RRR",
    "RRR",
    "RRR"
  ],
  "key": {
    "R": "tutorial_mod:ruby"
  },
  "result": {
    "id": "tutorial_mod:ruby_block",
    "count": 1
  }
}
The input of your recipe is defined through the pattern, which represents the crafting grid. The key then maps the characters you put in your pattern to the corresponding item. Your result is specified in the result block, where you give the id of the output item and the count of items you want to receive. The resulting recipe in Minecraft then looks like this:

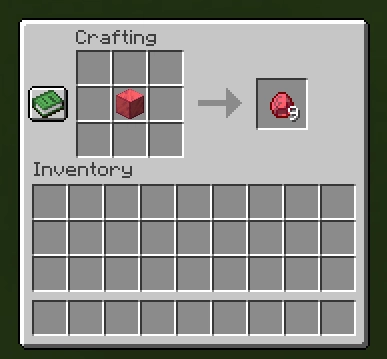
Shapeless Recipes
Next we want to create the reverse recipe from Ruby Block to Rubys as a shapeless recipe. We therefore need to write the following json-File:
{
  "type": "minecraft:crafting_shapeless",
  "ingredients": [
    "tutorial_mod:ruby_block"
  ],
  "result": {
    "id": "tutorial_mod:ruby",
    "count": 9
  }
}
The only major change compared to shaped recipes is how we define the input. Instead of giving a pattern and a key, we simply give a list of ingredients for the recipe. In contrast the result block is identical to the shaped recipes. In the game this recipe looks like this:
Smelting Recipes
Another basic recipe type are smelting recipes for the furnace. For this I have added a Ruby Ore block in the same way as the Ruby Block to the Tutorial Mod. We now add a smelting recipe to smelt this Ore into a Ruby, using the following json-File:
{
  "type": "minecraft:smelting",
  "ingredient": "tutorial_mod:ruby_ore",
  "result": {
    "id": "tutorial_mod:ruby"
  },
  "experience": 0.15,
  "cookingtime": 200
}
As you can see we need to specify the ingredient we want to smelt. Furthermore we specify the result, but unlike with crafting we don’t need to give a count, since smelting always results in 1 returned item. Whats new is the experience we obtain from smelting the item and the cookingtime specifying how many ticks it takes to smelt the recipe. The default time for the vanilla recipes is 200 ticks, as specified in the recipe as well. In Minecraft this results in the following:

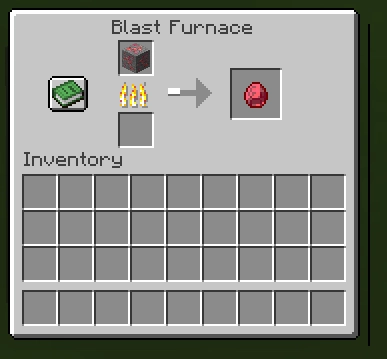
Blasting Recipes
The last recipe type I want to show in this post are blasting recipes for the Blast Furnace. Blasting recipes have an nearly identical structure to regular smelting recipes, in our case the following:
{
  "type": "minecraft:blasting",
  "ingredient": "tutorial_mod:ruby_ore",
  "result": {
    "id": "tutorial_mod:ruby"
  },
  "experience": 0.15,
  "cookingtime": 100
}
Other than the recipe type the only difference here is the cookingtime, which is set to the vanilla Blast Furnace smelting time of 100 ticks making the Blast Furnace twice as fast as a regular Furnace. If we try this out in the game, it looks like this:
Other Recipe Types
If you want to learn more about all the recipe types there are in the game, you can find an extensive list in the Minecraft Wiki. There you’ll also find all information on the optional parameters for the recipes covered here.
Now you have a mod consisting of blocks and items and the possibility to craft with them. In the next part I will show how to add block drops and explain the basics about the Minecraft Tag system.
Video
Please accept YouTube cookies to play this video. By accepting you will be accessing content from YouTube, a service provided by an external third party.
If you accept this notice, your choice will be saved and the page will refresh.
Related Content
Check out the entire series here.