Minecraft has multiple different mod-loaders, all with different compatibility sets, features and APIs. But when you want to create a mod for the game, the first decision you face is the choice of the mod-loader you use for your mod, with the two most popular choices for the latest version being Fabric and NeoForge. If you want your mod to support more than one loader, you essentially have three options on how to achieve this:
- You could simply create multiple independent mods, but this means a lot of extra work, since you need to write everything multiple times and when you need to update something, this has to happen in multiple different projects.
- You could create a project containing everything that only relies on game code as a common project and reference this code from loader specific projects containing all the loader specific code. But some of the code still needs to be written multiple times, since the loaders have incompatible APIs to one another in regards to for example registries.
- You could use a library, like Architectury API, that provide a toolchain to abstract the mod-loader specific calls and allows you to avoid writing loader specific code as much as possible, making it possible to create a mod for multiple mod-loading platforms without writing a single line of platform specific code.
In this series I will be showing you the third of those options, starting with the setup of our development environment. To follow this guide you should have prior experience with Java and should already have an IDE installed, I will be using IntelliJ in the Screenshots, which you can download for free here.
Additional Resources
The Tutorial Mod used here can be found on GitHub (state after this tutorial).
A video version can be found below.
Contents
- Getting the Architectury Template
- Opening the project, adding ParchmentMC and configure mod metadata
- Creating a Logger and testing our mod
- Video
Getting the Architectury Template
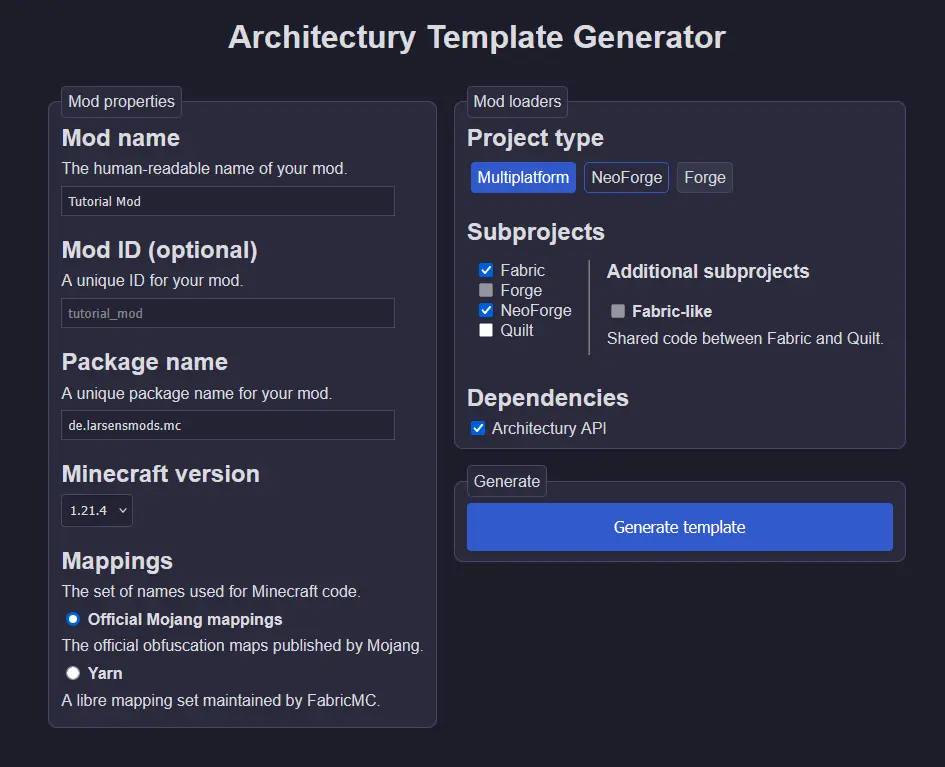
The easiest way to get started is by using the Architectury Template Generator provided by the Architectury developers. Here you need to give your mod a name, which is the one that will later be presented to the player in mod menus. Below that you can customize the mod ID, which is the internal identifier of the mod and used for example in item ID’s (similar to “minecraft:<item>”, your modded items would be “<mod_id>:<item>”). Next you need to define the package name where your mod code will be located, typically you use your domain in reverse order, optionally with another suffix as an identifier. After that you can select the Minecraft version for which you want to create a mod (this series focuses on the currently latest version 1.21.4) and the mappings you want to use in the IDE.
The mappings translate the obfuscated internal names of the game into human readable names for the editor. The template generator gives us two options: The official mappings provided by Mojang, which however only contain class and method names and lack for example parameter names, or the Yarn mappings maintained by the community, which contain more information than the official mappings, but rely on community effort and thus may not be available for new versions directly. I recommend sticking with the official mappings here and show later how to layer them with the community maintained Parchment mappings, which do provide the missing pieces for the official mappings.
On the right side you can select the loaders you want to support and whether you want to add the Architectury API dependency to your project, which is not required to create a multi-platform mod, but recommended as it provides us with additional functionality which can come in handy later down the line. If you are happy, simply click the “Generate template” button, download the generated archive and extract it into am empty folder.
Opening the project, adding ParchmentMC and configure mod metadata
The first thing you will see upon opening the previously extracted folder in your IDE is the Gradle import of the project. Wait until this has completed, even if it takes a couple of minutes to do so.
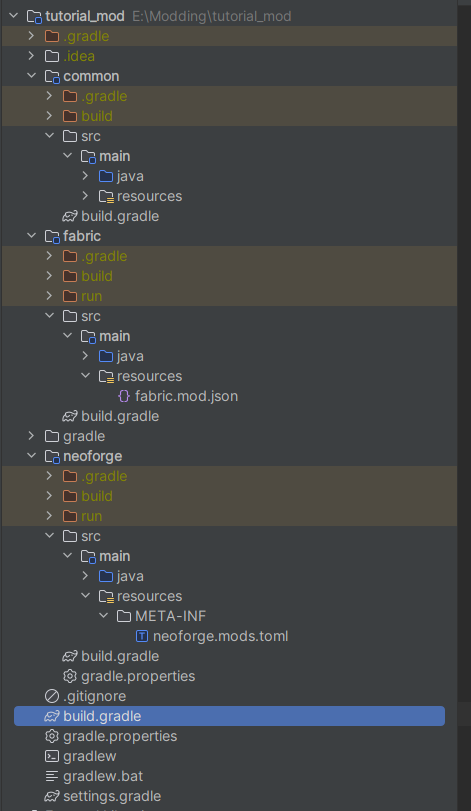
After the Gradle import has finished, the resulting project structure will look something like in the screenshot to the right. The important parts are the main build.gradle file (selected in blue near the bottom), where the global dependencies and configurations are done, and the three modules containing the actual code: common (containing everything that is platform independent, so in our case most of what we will be doing in the next chapters, and the mod-loader specific modules, in this case fabric and neoforge. In each of the modules you will find an assets and a code directory under src/main/<dir> containing the respective types of files.
To configure how your mod is presented to the player, you need to edit the mod loader specific information file, for fabric this is the fabric.mod.json found in fabric’s resources folder, for neoforge this is the neoforge.mods.toml found in the META-INF folder inside neoforge’s resources folder. Things you will probably want to change include the fields for authors, description and possibly icon/logo, but you can also change the other information, just consult the corresponding documentation for Fabric and NeoForge.
One important thing to mention is that if you choose to rename your Fabric mod entry classes (which are named ExampleModFabric and ExampleModFabricClient by default), you will also need to update the entrypoints block in the fabric.mod.json file; NeoForge on the other hand does not require any special changes when renaming the class with the @Mod annotation.
Adding ParchmentMC mappings to your project can be done in the main build.gradle file. In the allprojects block near the top of the file, you will need to add the ParchmentMC Maven repository by adding the following lines of code:
repositories {
    maven {
        name = 'ParchmentMC'
        url = 'https://maven.parchmentmc.org'
    }
}
Next find the mappings declaration under subprojects->dependencies and replace the following line:
//Replace: mappings loom.officialMojangMappings()
//with:
mappings loom.layered() {
    officialMojangMappings()
    parchment("org.parchmentmc.data:parchment-${rootProject.minecraft_version}:YYYY.MM.DD@zip")
}
Replace the highlighted YYYY.MM.DD with the date of the newest release for your selected Minecraft version, which can be found on the ParchmentMC website.
Creating a Logger and testing our mod
In the last step we will create a logger and start the game to see, if our mod is correctly initialized. For this we can use the following code in our common mod class:
//Define the logger:
public static final Logger LOGGER = LoggerFactory.getLogger(MOD_ID);

public static void init() {
    //Write a message with the logger:
    LOGGER.info("Initializing Tutorial Mod");
}
To test if our mod works correctly, we can launch a test instance of the game through the auto-generated run configurations in the top right of our IntelliJ window. Here you will find a run-profile for both the client and the server. If you start any of the profiles, you should see the corresponding game-type and mod loader starting up, and you should be able to see the log message shown above in the console log.
This concludes the setup of our Architectury modding project, in the next part we will add a custom item to the game, using only Architectury and Minecraft functionality and without writing a single line of loader specific code.
Video
Related Content
Check out the entire series here.
Pingback: Basic Items – Architectury API Multiplatform Modding - Larsen's Mods