After covering the basics, I will now show you more advanced things regarding blocks, starting with modding in directional blocks in your Architectury API multiplatform mod. If you want to learn more about the basic registry process for blocks, check out the Basic Blocks guide first.
Additional Resources
The Tutorial Mod used here can be found on GitHub (state after this tutorial).
A video version can be found below.
Contents
- Directional Blocks Classes
- Registering Blocks and BlockItems
- Resource Differences
- Blockstates
- Minecraft
- Video
Directional Blocks Classes
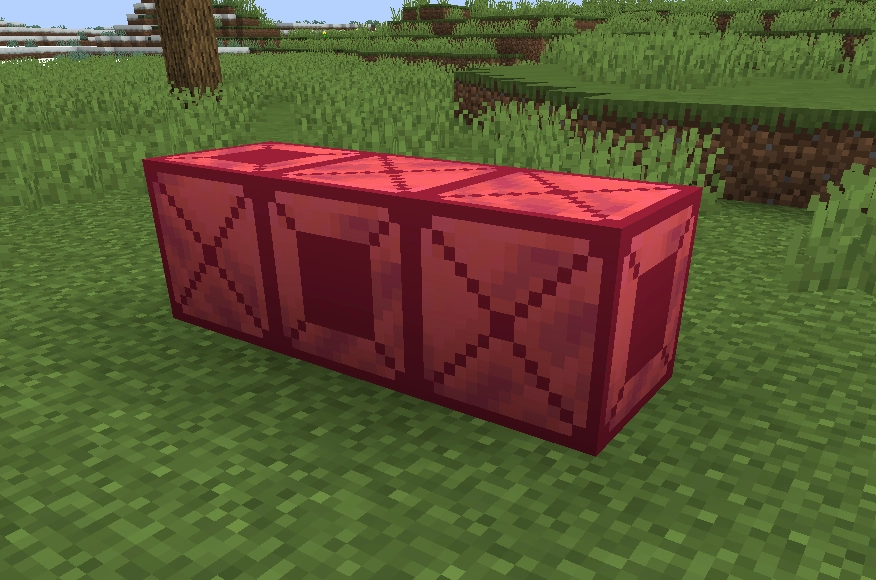
Until now we created all of our blocks using Minecraft’s default Block class. Since we want to add properties to our blocks, this is no longer sufficient. Therefore we are going to create classes for our rotatable blocks, which we can later expand to add more complex functionality like storage. The first block we are going to add is a Ruby Crate, which has an opeing always facing towards the player. A class for this block looks like this:
public class RubyCrateBlock extends DirectionalBlock {

    //CODEC
    public static final MapCodec<RubyCrateBlock> CODEC = simpleCodec(RubyCrateBlock::new);

    @Override
    protected @NotNull MapCodec<? extends DirectionalBlock> codec() {
        return CODEC;
    }

    //CONSTRUCTOR
    protected RubyCrateBlock(Properties properties) {
        super(properties);

        this.registerDefaultState(this.getStateDefinition().any().setValue(FACING, Direction.NORTH));
    }

    //PLACEMENT
    @Override
    public @Nullable BlockState getStateForPlacement(BlockPlaceContext context) {
        return this.defaultBlockState().setValue(FACING, context.getNearestLookingDirection().getOpposite());
    }

    //BLOCK MODIFICATIONS
    @Override
    protected @NotNull BlockState rotate(BlockState state, Rotation rotation) {
        return state.setValue(FACING, rotation.rotate(state.getValue(FACING)));
    }

    @Override
    protected @NotNull BlockState mirror(BlockState state, Mirror mirror) {
        return state.rotate(mirror.getRotation(state.getValue(FACING)));
    }

    //REGISTER BLOCKSTATE PROPERTY
    @Override
    protected void createBlockStateDefinition(StateDefinition.Builder<Block, BlockState> builder) {
        builder.add(FACING);
    }
}
Content Explained
As you can see our new class extends the DirectionalBlock class. It already defines the blockstate property FACING for us, which we want to use for our block. The first thing inside our class is the Codec definition, used for the games internal serialization mechanisms. In our case we use the provided simpleCodec() method, since we don’t need any advanced things here for now.
In our constructor we simply pass through the BlockProperties. Additionally we also register the blocks default state by getting any state from the state definition and setting it to face north. The getStateForPlacement() method becomes relevant when our block is placed down. We obtain a BlockPlaceContext which gives us the players looking direction that we then apply onto our block. The reason we call .getOpposite() is that we want the blocks front to face towards us, so in the opposite direction of our look.
The rotate() and mirror() methods are used to determine how the blockstate should change if the block is mirrored or rotated through for example commands or structure blocks. We simply use the game provided methods to obtain the correct rotation here.
Finally we need to add the FACING property to our blocks blockstate definition through the createBlockStateDefinition() method. We get a builder as a parameter and need to call its add() method to add our property.
A second block
In the same way we will also add a second block, the Ruby Furnace. It should have a similar placement behaviour as the vanilla furnace, meaning its front should never face up or down. Its block class is structure identically to the one for the Ruby Crate above, with the only difference being the getStateForPlacement() method:
@Override
public @Nullable BlockState getStateForPlacement(BlockPlaceContext context) {
    return this.defaultBlockState().setValue(FACING, context.getHorizontalDirection().getOpposite());
}
Instead of the nearest looking direction, we use the horizontal direction here, which always gives us NORTH, SOUTH, WEST or EAST.
Registering the Blocks and BlockItems
Next we need to register our blocks and their BlockItems. We do this in the same way as our regular blocks. The only difference is that we now refer to our custom block classes instead of the default one:
...
RUBY_CRATE = registerBlock("ruby_crate", () -> new RubyCrateBlock(
        baseProperties("ruby_crate").requiresCorrectToolForDrops().strength(3.5f))
);
RUBY_FURNACE = registerBlock("ruby_furnace", () -> new RubyFurnaceBlock(
        baseProperties("ruby_furnace").requiresCorrectToolForDrops().strength(3.5f))
);
...
Registering the block items is identical to any other block, so I omit the code here.
Resource Differences
When it comes to resources, there are some similarities, some small and some very big differences from our regular blocks. Adding the language and item definitions is identical to basic blocks. For our models and textures however there are a few things different. As we want to have different textures on different sides, we need to create said textures and place them in the textures/block folder. We then need to apply those textures to their respective sides in the block model:
{
  "parent": "minecraft:block/orientable",
  "textures": {
    "front": "tutorial_mod:block/ruby_furnace_front",
    "side": "tutorial_mod:block/ruby_furnace_side",
    "top": "tutorial_mod:block/ruby_furnace_top"
  }
}
The first thing that is different is our models parent. Rather then cube_all we now use orientable as our parent model. This allows us to specify different side textures for our block. In this example we use the front, side and top keywords here to apply our corresponding ruby furnace textures. For the ruby crate we use an identical file, but use our side texture both at the side and top faces.
Blockstates
The last part for our block to work correctly is the blockstates file. Until now we only specified one variant here using the empty string (“”) as identifier, since our blocks did not have any blockstate properties until now. The blocks we added in this tutorial however now have the facing property, meaning we can use it to specify the model that should be displayed in Minecraft:
{
  "variants": {
    "facing=east": {
      "model": "tutorial_mod:block/ruby_crate",
      "y": 90
    },
    "facing=north": {
      "model": "tutorial_mod:block/ruby_crate"
    },
    "facing=south": {
      "model": "tutorial_mod:block/ruby_crate",
      "y": 180
    },
    "facing=west": {
      "model": "tutorial_mod:block/ruby_crate",
      "y": 270
    },
    "facing=down": {
      "model": "tutorial_mod:block/ruby_crate",
      "x": 90
    },
    "facing=up": {
      "model": "tutorial_mod:block/ruby_crate",
      "x": 270
    }
  }
}
As you can see we specify each possible facing of our Ruby Crate here. While all of those variants share the same model we created earlier, all but one have an additional rotation applied. For the four sides we rotate the model around the y-Axis by the correct amount, for the up and down facing variants we use the x-Axis for rotation instead.
As our Ruby Furnace should only rotate to the sides, we can omit the facing=down and facing=up variants for this one.
Minecraft
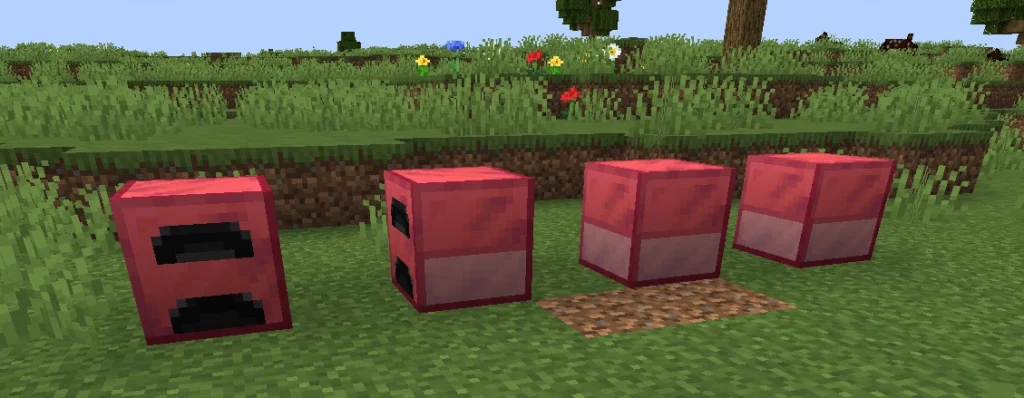
That concludes all the things we need to do to get our directional blocks into Minecraft, so here is how they look in different orientations when placed down:
In the next part I show you the first step into getting functionality into our blocks, by adding basic BlockEntities to them.
Video
Please accept YouTube cookies to play this video. By accepting you will be accessing content from YouTube, a service provided by an external third party.
If you accept this notice, your choice will be saved and the page will refresh.
Related Content
Check out the entire series here.
Pingback: Block Entity Basics - Architectury API Multiplatform Modding - Larsen's Mods