In this part we will built upon the directional blocks from the last part and cover block entity basics. We will then built upon those to add functionality to our blocks. We will first modify our Ruby Crate class to allow us to add block entities, create a class for our block entity and register it as a BlockEntityType.
Additional Resources
The Tutorial Mod used here can be found on GitHub (state after this tutorial).
A video version can be found below.
Contents
Block Entity Basics
As I explained in the last part, blockstates are used to add properties to blocks, the rotation for example. They can affect the rendering of the block, but are limited in what they can store. BlockEntities however are a more advanced way to store information related to a block. To cite the Minecraft Wiki:
“Block entities can store additional information about their block, beyond the finite set of block states that a block may have. For example, all blocks that can store items use a block entity for this purpose. Block entities can also tick, running code regularly while loaded, even when not interacted with directly. Complex rendering not available to normal block models is also achieved with block entities.”
In this part I show how to add a block entity to a block, while I cover the things that built upon them, like inventories, later.
Block Class
The first thing we need is a class for our block so that we can later associate our BlockEntities with the block.
If you want to use a directional block as added in the last part, click to see how you need to modify your block class.
Since we want to add a BlockEntity to our block, we can no longer extend DirectionalBlock in our block class. Instead we will later use BaseEntityBlock as our superclass. For this reason we need to define the blockstate property for our FACING value inside of our block class. For this you need to add the following:
public static final EnumProperty<Direction> FACING;

static {
    FACING = BlockStateProperties.FACING;
}
This replaces the property definition from the DirectionalBlock class, so that we can now replace the super class as show below. We will also need to change the codec definition; this is shown below since we need to define it anyway.
We create a block class extending the BaseEntityBlock class. It provides us with the required methods to implement BlockEntities. We first need a constructor that simply passes the Block Properties to the super constructor. Additionally we need to define the codec() method, which is used by the game for serialization purposes. We do this the following way:
public class RubyCrateBlock extends BaseEntityBlock {

    //CODEC
    public static final MapCodec<RubyCrateBlock> CODEC = simpleCodec(RubyCrateBlock::new);

    @Override
    protected @NotNull MapCodec<? extends BaseEntityBlock> codec() {
        return CODEC;
    }

    //CONSTRUCOR
    protected RubyCrateBlock(Properties properties) {
        super(properties);
    }
}
Another thing we need to implement is the newBlockEntity() method. It is called by the game to create a block entity once our block is later placed down. We are going to call the class for it RubyCrateEntity, so we can pass a new instance of this class here. We are also going to create a Ticker for our block to test if we implement everything correctly. This ticker can also be used to run any code that our BlockEntity should run every tick. We provide our Ticker through the getTicker() method. Those two methods then look like this:
@Override
public @Nullable BlockEntity newBlockEntity(BlockPos pos, BlockState state) {
    return new RubyCrateEntity(pos, state);
}

@Override
public @Nullable <T extends BlockEntity> BlockEntityTicker<T> getTicker(
            Level level, BlockState state, BlockEntityType<T> blockEntityType
            ) {
    return new RubyCrateEntity.Ticker<>();
}
Block Entity Class
We now need to actually create said class for our BlockEntity. For this we create a new class with the name we chose above and let it extend BlockEntity. This is the base class for all block entities; there are more specific versions that implement additional functionality, but we will come to those when we implement further features. For now we will stick with the base class. Inside of this class we need a constructor that takes a BlockPos and a BlockState as arguments and passes them, together with the block the entity should be linked to, to the super constructor.
Furthermore we create a static class inside our BlockEntity class for the ticker. This static class implements the BlockEntityTicker<> interface and implements its tick() method. The tick method is then executed every tick; for this tutorial I will put a log message inside to see that everything works later in the game. With those two things our class looks something like this:
public class RubyCrateEntity extends BlockEntity {

    //CONSTRUCTOR
    public RubyCrateEntity(BlockPos pos, BlockState state) {
        super(TutorialModBlockEntityTypes.RUBY_CRATE.get(), pos, state);
    }

    //TICKER
    public static class Ticker<T extends BlockEntity> implements BlockEntityTicker<T> {
        @Override
        public void tick(Level level, BlockPos blockPos, BlockState blockState, T blockEntity) {
            TutorialMod.LOGGER.info("Log Message");
        }
    }
}
Block Entity Type
Next we need to register a BlockEntityType for our BlockEntity. The process for this is a bit more complicated than blocks and items though. The reason for this is that since 1.21 Minecraft no longer provides us with a way to create a BlockEntityType ourself. We therefore cannot do this from our common module, instead we need to rely on the methods for creating BlockEntityTypes provided by Fabric and NeoForge. But first we need to define a common class to hold those Types and their corresponding registration methods.
Common Class
Inside our common class we need to define, similar to blocks and items, a DeferredRegister for BlockEntityTypes. We also create a RegistrySupplier for our block-specific BlockEntityType as well as a helper method for writing such a type to our DeferredRegister. Finally we add a method to write this register to the game. With this our common class looks like this:
public class TutorialModBlockEntityTypes {

    //DEFERRED REGISTER
    private static final DeferredRegister<BlockEntityType<?>> BLOCK_ENTITIES
            = DeferredRegister.create(TutorialMod.MOD_ID, Registries.BLOCK_ENTITY_TYPE);

    //REGISTRY SUPPLIER
    public static RegistrySupplier<BlockEntityType<RubyCrateEntity>> RUBY_CRATE;

    //WRITE TO GAME REGISTRIES
    public static void writeRegister(){
        BLOCK_ENTITIES.register();
    }

    //HELPER METHOD FOR WRITING TO REGISTER
    public static <T extends BlockEntityType<?>> RegistrySupplier<T> registerBlockEntity(
            String name, Supplier<T> blockEntity
            ){
        return BLOCK_ENTITIES.register(ResourceLocation.fromNamespaceAndPath(TutorialMod.MOD_ID, name), blockEntity);
    }
}
We now need to extend this class in our fabric and neoforge modules to populate the RUBY_CRATE variable with a value using the registerBlockEntity() method we defined.
Fabric
In our fabric module we can now create a class and let it extend the common class defined above. Inside this new class we can then create a new method and initialize our BlockEntityTypes from it:
public class TutorialModBlockEntityTypesFabric extends TutorialModBlockEntityTypes {
    public static void initBlockEntityTypes(){
        RUBY_CRATE = registerBlockEntity("ruby_crate", () ->
                FabricBlockEntityTypeBuilder.create(RubyCrateEntity::new, TutorialModBlocks.RUBY_CRATE.get()).build()
        );

        writeRegister();
    }
}
As you can see we use the FabricBlockEntityTypeBuilder provided by Fabric to create a type for our block entity. We need to provided with both the constructor for our RubyCrateEntity class and our block the entity should be linked to. We also need to call the init method defined here from our main fabric mod class, after we have called our common init() method there.
NeoForge
We now need to repeat this process for NeoForge. We again create a new class and extend our common class. The only thing that differs from the fabric implementation is that NeoForge makes the private constructor of the BlockEntityType class from Minecraft public, so that we can use that. So in NeoForge our code looks like this:
public class TutorialModBlockEntityTypesNeoForge extends TutorialModBlockEntityTypes {
    public static void initBlockEntityTypes(){
        RUBY_CRATE = registerBlockEntity("ruby_crate", () ->
                new BlockEntityType<>(RubyCrateEntity::new, TutorialModBlocks.RUBY_CRATE.get())
        );

        writeRegister();
    }
}
Again, don’t forget to call the init method defined here after the common init() method in you NeoForge mod main class.
Minecraft
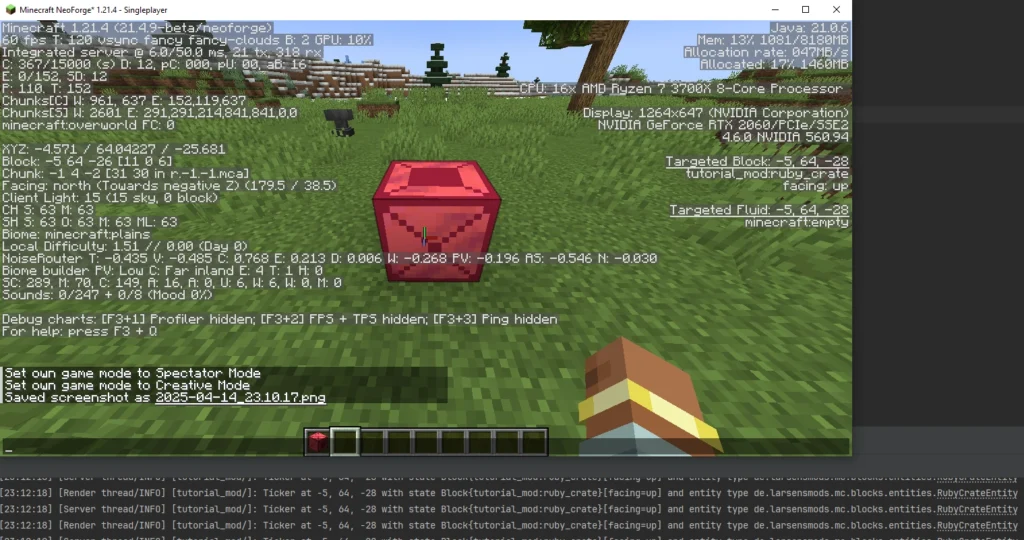
With that we have everything to get our block entity into the game. As shown above I added a log message to the Ticker for our entity, so if we launch the game and place down a Ruby Crate, we can see a log message printed in the console:
With that you know how to add basic block entities, in the next part I show how to add an inventory to one.
Video
Please accept YouTube cookies to play this video. By accepting you will be accessing content from YouTube, a service provided by an external third party.
If you accept this notice, your choice will be saved and the page will refresh.
Related Content
Check out the entire series here.
Pingback: Basic Container Blocks - Architectury API Multiplatform Modding - Larsen's Mods
Pingback: Ore Generation - Architectury API Multiplatform Modding - Larsen's Mods