After we have added Tools and Swords to the game in the last part, this time we add Armor to Minecraft. Similar to tools we also need to first define an armor material for our armor. A major difference however lies in the rendering of the armor when worn.
Additional Resources
The Tutorial Mod used here can be found on GitHub (state after this tutorial).
A video version can be found below.
Contents
Armor Material
The first thing we need to add is the armor material for our armor. It specifies the properties of our armor like durability or damage resistance. But before we can add the material we need to define two required properties: The repair item tag and the armor material key. The tag for our repair items is defined similar to the one used for tools:
public static final TagKey<Item> REPAIRS_RUBY_ARMOR = TagKey.create(
        Registries.ITEM, ResourceLocation.fromNamespaceAndPath("tutorial_mod", "repairs_ruby_armor")
);
Furthermore we need to create an armor material key. It tells the game where to lookup the textures for the armor when worn. We create this key in the following way:
public static final ResourceKey<EquipmentAsset> RUBY_ARMOR_MATERIAL_KEY = ResourceKey.create(
        EquipmentAssets.ROOT_ID, ResourceLocation.fromNamespaceAndPath("tutorial_mod", "ruby")
);
The second parameter in the ResourceLocation defined here specifies the file name, which we need later. Now we can create our armor material:
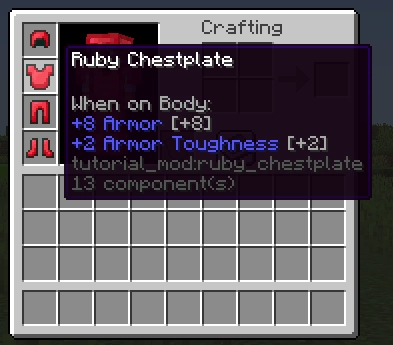
public static final ArmorMaterial RUBY = new ArmorMaterial(
        24,                                    //Durability factor
        Map.of(                                //Damage resistance for different armor parts
                ArmorType.HELMET, 3,
                ArmorType.CHESTPLATE, 8,
                ArmorType.LEGGINGS, 6,
                ArmorType.BOOTS, 3
        ),
        12,                                    //Enchantability
        SoundEvents.ARMOR_EQUIP_DIAMOND,       //Put on sound (right-click)
        2.0f,                                  //Toughness
        0.0f,                                  //Knockback resistance
        TutorialModTags.REPAIRS_RUBY_ARMOR,    //Repair item tag
        RUBY_ARMOR_MATERIAL_KEY                //Armor Material Key
);
The durability defines a factor with which the base durability for each armor type is multiplied. See the wiki for more information on this. Next we specify the damage resistance of the different armor parts as a map. Following this are the enchantability (how well an item can be enchanted) and the sound played when the armor is put on through right-clicking with a piece in the hand. Next we define the armor toughness and knockback resistance. Finally we add our repair item tag and the material key created earlier to our armor material.
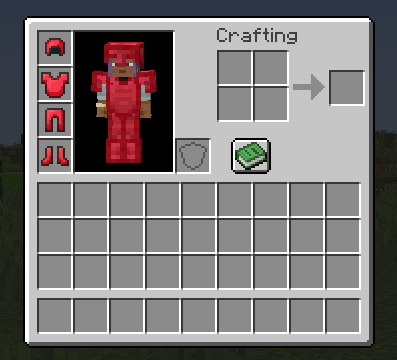
Armor Items
Now that we have a material for our armor, it’s time to add the items themselves. For our Ruby Helmet for example, the code would look like this:
public static RegistrySupplier<Item> RUBY_HELMET;

public static void initItems() {
    ...
    RUBY_HELMET = registerItem("ruby_helmet",
        () -> new ArmorItem(TutorialModArmorMaterials.RUBY, ArmorType.HELMET,
                  baseProperties("ruby_helmet").arch$tab(TutorialModTabs.TUTORIAL_TAB)
        )
    );
    ...
}
In contrast to tools, armor items all share the same class (ArmorItem) and are differentiated by the armor type given to them. You need to replace the bold HELMET with the respective item type for the other armor parts. Furthermore we need to add two sets of resources to our item. The first is for the item as shown in the inventory. The steps for this are identical to regular items, so I’ll not show them here again. The second set contains the resources for the worn armor. Also remember not to forget adding your item to the repair items tag. Check out the guide on tools to see how this is done.
Special Resources
As explained above we need to tell the game where to find the textures for our worn armor. For this you need to create a file with the name specified in your armor material key at the path resources/assets/tutorial_mod/equipment/ruby.json:
{
  "layers": {
    "humanoid": [
      {
        "texture": "tutorial_mod:ruby"
      }
    ],
    "humanoid_leggings": [
      {
        "texture": "tutorial_mod:ruby"
      }
    ]
  }
}
In this file we specify the textures for the different possible armor layers. For our regular armor we need two layers: The upper body (humanoid) and the legs of the player (humanoid_leggings). We specify the texture to use in the respective blocks. We need to place the accordingly named .png-Files at resources/assets/tutorial_mod/textures/entity/equipment/humanoid/ruby.png and resources/assets/tutorial_mod/textures/entity/equipment/humanoid_leggings/ruby.png respectively.
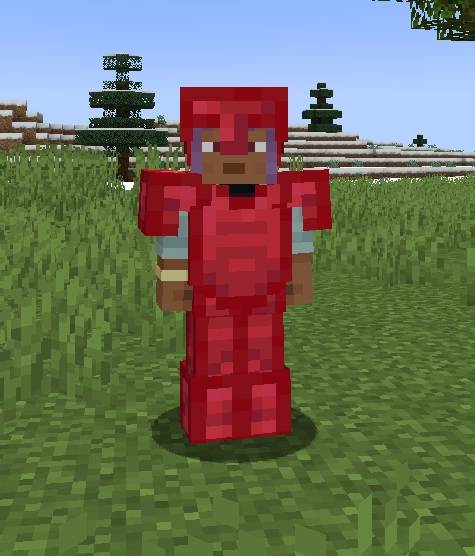
Ingame
With that we have added our armor pieces and can jump into the game to see how they look:
That concludes the relevant basic things, in the next parts I’ll explain some more advanced topics related to blocks, starting with rotatable blocks like furnaces and pistons.
Video
Please accept YouTube cookies to play this video. By accepting you will be accessing content from YouTube, a service provided by an external third party.
If you accept this notice, your choice will be saved and the page will refresh.
Related Content
Check out the entire series here.